Laurie Bellet
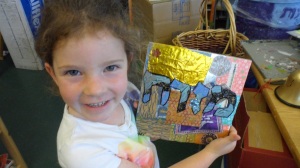
 At Oakland Hebrew Day School, no one ever needs to ask this question or even wonder. In every room, there is a student created mizrah plaque. Why do we need a mizrah? A mizrah (east) plaque makes it clear, for purposes of tefillah, which way we face in order to look towards Israel. (If you are reading this in Asia, the previous statement does not apply but, that is discussion for another day) A mizrah plaque is a beautiful addition to any classroom or home. It is another way to declare that ‘this’ space is Jewish. In the classroom, especially, it is a reminder that the room and its activities are ‘kodesh.’
 It is wonderfully easy, and inexpensive, to design a mizrah making activity that can engage even our youngest students successfully. It is best to begin with a sturdy base (approximately 8” X 10” or thereabouts). A wood panel, stretched canvas or a canvas board work very well. If your budget is extra tight, you can complete the activity using mat board, cardboard, or even construction paper. However, these will have a tendency to curl and will not give you as professional a look.
Prior to teaching this experience, you will need to cut out the letters mem, zion, resh and het. Work carefully to ensure that the letters will fit your base comfortably. You can use ordinary construction paper for this or a fancier decorator paper. I like to use a variety of colors and types of paper for the letters so that that student artists will have a choice for finalizing their art pieces.
In addition to the letter cut outs, you will need a variety of colored papers/scraps. I generally by a large package of patterned origami paper. To minimize my preparation work, I buy the smallest size paper I can find. You can also use scraps of wrapping paper, scrapbook paper or magazine cut outs.
To set the stage, I prepare the work space by covering the tables. At each child’s seat, I place the base material (canvas board, wood etc.) and a foam brush or inexpensive (large) paint brush. I place the colorful origami or scrap papers on trays that the children can reach. The children will also need Mod Podge, in bowls, where it can been readily reached. I do not yet put out the cut out Hebrew letters! (*Note—If you do not think that your students will be able to cover the entire base with the paper scraps/pieces, have them paint the base their favorite color[s] as the first step.)
From this point on, the mizrah can almost create itself. Spread the Mod Podge on the base surface. Lay the decorative paper(s) flat onto the Mod Podged surface. Paint the Mod Podge on top of the papers as well. Continue this process until the entire base has been covered.
Offer students the letters for the word mizrah. I prepare guide sheets, in advance, for the students to refer to in order to have the word properly spelled. No matter what, I always double check the placement and orientation of the letters. Place the letters onto the Mod Podged surface and cover the entire piece with an even (as much as is possible) coat of Mod Podge. Although the Mod Podge goes on white, it will dry to a clear finish. If you are working with older children, they can use light weight yarn, dipped in Mod Podge, to outline each letter. My students enjoy finishing the work with one or two (maybe even three) sparkling gems, affixed with Tacky Glue!
Depending on the age level of the students, I sometimes glue an explanation of the mizrah to the back of the piece. This is a perfect process for an individual student, or a large group, classroom work or family education, formal or informal setting. At OHDS, we made two dozen mizrah plaques for a school that was rebuilding after Hurricane Sandy; forty plaques for our own school as part of our Yom ha-Atzma’ut celebration and some individual students and teachers created them for their own homes and as special gifts. Please let me know how you implement, and enjoy, the mizrah making experience at your school!

