Laurie Bellet
 Along the back shelves in the Art Studio at Oakland Hebrew Day School are fabrics — books of fabric samples, boxes of fabric remnants, fabric on rolls and brand new fabrics in packages. Yet, I do not sew in any meaningful fashion. I can hand stitch a button or a hem, blanket stitch a craft or run a straight line of stitches on a sewing machine but that is the extent of my stitchery skills. So, it is a great wonder that my students (K through 8) are well known for turning out many fine pieces of fabric art. We make quilts and collages, dolls and silk hoops, challah covers and wimplen (the plural of ‘wimple’).
The Wimple
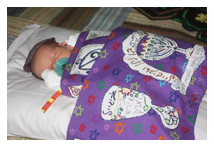
A wimple is the belt that ties around the Torah scroll, under the velvet mantle. In pre-Shoah Eastern Europe, a wimple was crafted from the swaddling clothes worn by an infant at brit milah. This wimple wrapped the Torah at the child’s consecration, at Bar Mitzvah, on any occasion when the child read from Torah and then became part of the wedding chuppah. This custom was nearly lost in the Shoah. In the 1990’s, contemporary artists revived the wimple tradition They reinvigorated the custom by making a wimple to wrap infants (male and female) at brit milah or bat simchah, assuring that these children would begin life wrapped in Torah.
Wimple making has also gained popularity as a family education experience, prior to b’nai mitzvah. At Oakland Hebrew Day School, each 2nd grade student makes a wimple before Chaggigat haChumash (receiving the first chumash).
Actually, we make a wimple for every new baby born to Jewish faculty members. For our simplest collaborative wimple, we begin with the blank wimple fabric from Torah Aura. Generally, I prepare the base fabric by stenciling a selected shape for every child to participate in the project, frequently a Torah or a pomegranate (basic geometric shapes work just as well). So I can ensure quality, my students sketch a preliminary design in their sketchbooks for my approval. When they have a successful plan, they go to the wimple (laid out on a table with clean paper underneath it), “adopt” a shape and render their design, on the wimple, with Crayola fabric markers. If they prefer, students can first outline the designs in the sketchbooks with black marker, lay the sketch under their adopted shape, and trace the design onto the wimple. While there is no halachah regarding the wimple, there are traditional blessings that you can find online to add in the center of the fabric. You can also write your own blessing, lines from favorite text, the family surname or, if you know it, the baby’s name. If you are making the wimple as a solo artist, you can use the pattern kit that Torah Aura offers for tallit making for design templates and ideas. In addition to the Crayola fabric markers, you can use permanent markers from Bic or Sharpie, fabric paints or fabric dyes to color your wimple. Whatever your color medium, you should iron the finished wimple to set the dyes.
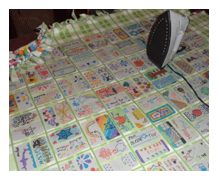
Sometimes for a wimple and always for a quilt (which we make for the newborns of non-Jewish faculty) we use a patchwork method. For this you need a length of base fabric. Unless you are a good seamster, you want to buy fabric that does not stretch. The length of the fabric is determined by the number of patches you will be attaching.
 For a quilt (can also be used as a fabulous alternative to group get well cards), I get 2 panels of fleece fabric; I fringe around the edges and tie the fringes into knots. I like to use one plaid fleece fabric so that measuring for fringes and patch placement is simplified. You also need to buy a white fabric and a product called ‘double sided fusible webbing.’ To prepare the patches, you must first iron the white fabric to the fusible webbing. After determining the size of your patches measure and draw your squares (or other shape) with a pencil on the paper side of the now fused fabric. Fabric that is fused to the webbing is easy to cut. To avoid confusion later on, I mark an X on the reverse side of the fabric to alert students to the proper drawing side. Students then can decorate their patches with fabric markers or paints. For the wimple base, stitch around the edges of the wrong side of the fabric and leave a small opening. Then, turn the fabric right side out through that opening and sew up the hole. You can fold and stitch the ends to form a point if you wish. Attach ribbons to the ends with fabric glue or by stitching. Lay out the patches and iron them on according to the directions on the fusible webbing. An even simpler alternative is to buy the kind of iron on patches that are sold to repair worn out knees on trousers. I recently purchased hundreds of these inexpensively from American Science and Surplus.
If your participant community is far flung, you can send each a patch in the mail. In this case, participants can draw their patches in pencil before sending them back to you. Then, you can add the color.


