Laurie Bellet
 I love the work of Israeli artist Peter’G. (Peter Gandolfi) Whimsical and colorful, his paintings feature bright children in Jerusalem, floating on, and playing with, bubbles. Sometimes celebrating holidays, other times playing simple games the art offers us perfect starting points for many areas of curriculum.
Peter’G was born in Italy (last name—Gandolfi) and made aliyah to Israel. You can see many examples of his work online. Happily, his prints are quite affordable and make wonderful additions to every school hallway.
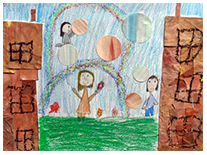
A Peter’G art experience does take some advance preparation by the classroom teacher. I begin by preparing the paper for the “bricks.” I take white construction paper and spray it with water. Then, to give it texture, I carefully crumple the paper and open it. Next, I soak the paper in brown watercolor paint, sometimes adding a bit of black or even blue or purple. After the “brick” paper dries, I cut it into rectangles and some into semi-circles. I also prepare the bubbles in advance by painting white paper with metallic watercolors and cutting this paper into my bubble circles.
In class, begin by scrutinizing the Jerusalem architecture. By identifying the basic shapes and how Peter’G uses them, students easily see how they too can accomplish this. Then, discuss the theme of the image(s) you have chosen. What is happening in the picture(s)? How do you know?
Now direct your students to your area of learning. Together, brainstorm picture ideas, Peter’G style, that reflect your curriculum. Before beginning the hands-on work, check-in with everyone to see if they have an idea with which to begin and support those who do not with extra learning.
- Using white construction paper (whatever size you wish), begin by drawing a horizon line, halfway or more, up the page. Next, lightly draw an outline of where the building(s) will go.
- Remind students that everyone will design their own unique buildings. Using the ready- made “bricks,” and glue sticks, students begin building. Encourage them to cut the bricks into the shapes that best suit their design needs and to cross over the horizon line.
- When the buildings are well underway, take some time to examine how Peter’g makes the children in his paintings. Students will readily see that he uses circular heads with simple faces, triangular bodies, and rectangular limbs. Practice drawing these in various positions.
- With the building(s) complete, students can design the rest of the scene. Let them know that you have already made and cut out the bubbles and that these will be added last. I give my students sample bubbles to assist them in composing their scene. Students complete the work, with crayons, colored pencils and oil pastels, adding details, as desired to the building(s).
- Finally, students can use glue sticks to place the bubbles onto their scenes.
- To assess your students understanding of the material, interview each student or have them write a few sentences about the content of their scene. Students should title their art for display.
For this lesson plan and others based on Jewish artists, visit lbellet.wordpress.com. To see more student work from Oakland Hebrew Day School, visit us on FaceBook – Art at OHDS.


