Laurie Bellet
 Collaborative, community art experiences are time consuming, complicated, pressure laden and exhausting. So, why do I love to undertake them?
It might be for the challenge, for the excitement of seeing the final piece come to successful completion, or for the joy I feel in watching the students’ investment in the undertaking. Whatever the reason, it is something we do, in a big way, at Oakland Hebrew Day School each year, to celebrate Yom HaAtzma’ut. In fact, walking through the school corridors, you get a comprehensive view of school wide, Israel education spanning the past 10 years. Typically, Yom HaAtzma’ut culminates in the completion of a dramatic art piece that resonates with the touch of every student’s hand.
To begin these large art adventures, I always start with the overarching lesson idea to be taught. This year, I focused on Israel’s national anthem, HaTikvah. Over the course of the past 67 years, many Jewish students have sung the soul stirring lyrics of this song, yet few ever learn what the verses mean, beyond The Hope.
 I had only a vague idea of the art we would design when we began our study. After parsing the text, I asked my middle school students to select a few of the major themes (heart, soul, hope, gazing, land, Zion and east), and submit an original sketch to me that would visually demonstrate their understanding of the song. I repeated this exercise in the form of classroom discussion with students in grades K-5. Added to my own ideas, we had the basis for what would become 2 magnificent pieces of art.
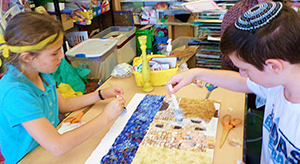
At OHDS, my student artists learn about Israeli textile artist Bracha Brym Lavee, in the 3rd grade. Building on this knowledge and experience, artists in grades 4-8 worked on a giant (4ft by 6 ft approx.) textile interpretation of HaTikvah. Using the student sketches and ideas generated from discussion, I sketched the basic design, and accumulated the fabrics we would need. Because we sing the HaTikvah every morning with the raising of the flag, we utilized the flag as an underlying structural motif. To control the quality of the final product (necessary for installation art), I coded each part of the art (we worked on 13 canvasses, 16”x20”each) with the fabric which would ultimately, fill the space. To proactively ease the potential craziness associated with 4 groups of 14 students each (30 minutes per rotation), I put the necessary fabric in baggies and taped each to its associated canvas. (*Important note….I also previewed the activity with a few 5th and 8th grade students to identify weaknesses in my plan. Even then, I missed a few necessary instructions!)
When each group of students came in to work, we reviewed the learning together, and the students were able to see their contributions to the design. The basic process was quite simple. While some students cut the fabric into small rectangular mosaic pieces, other students brushed the canvas with a coat of Mod Podge. They laid the fabric pieces and covered them with another, even, coat of Mod Podge.
 Destined to hang on the eastern wall of our multi-use room, the completed art was spectacular! During the remainder of the day’s events, students asked if they could go into the Art Studio to see the final result. Their faces glowed with proud amazement of what they had accomplished together.
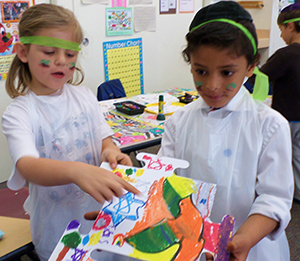
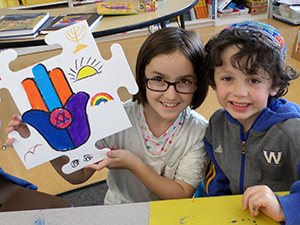
The younger (K-3) students also worked on smaller pieces that would become an integral art piece. Prior to Yom HaAtzma’ut, I previewed this art experience with my 3rd grade students, again to discover any pitfalls I had not considered. I took note of the design ideas generated by these students (the oldest in their rotation cohort) Then, on Yom HaAtzma’ut, in each group of 18 students (grades K-3) we reviewed the lyrics of HaTikvah and studied a page of the picture prompts offered by the 3rd grade. Some of the images, such as the Hoopoe bird and the calanit flower (national symbols) are challenging to render. I copied outline drawings of these and some of the more difficult ideas and cut them out for the children in the event that they wanted to color these to glue onto their final piece. Then, working in pairs, on giant ((12”x12”) jigsaw puzzle pieces from BareBooks.com, the children (18 children in each of the 30 minute rotations) rendered their visual imagery. Those who wanted to include some of the more difficult images embellished the prepared cut outs and glued them on the puzzle piece instead of drawing freehand. We used Crayola “color slicks” (a kind of compressed tempera) to ensure large and boldly colorful drawings. Working hevruta-style enhanced the exchange of ideas and interpretations while reinforcing the collaborative nature of the work. As the jigsaw pieces were completed, the young artists added them to the growing puzzle. The effect was magical. Prior to lunch, some of the first rotation artists came running in to see the final product. As students walked around the puzzle, commenting on the collective imagery, I felt the satisfaction of being present to authentic learning.

OHDS artists in grades 1 (my granddaughter!) and K (the son of our shlihim)—fresh from their “IDF Training” rotation—explain their design choices.
So, a quick recap. For a successful community art piece you need: a big idea that leads to compelling learning; an art plan that intrigues the students and that will lead to success; quality materials that will add to the learning and enhance the final product; comprehensive planning, preparation and practice; stamina! Challenging day? Yes! Exhausting? Indeed! And it all was so worth it!
P.S. This morning, the day after, my 1st grade students came in for class. I had the art5 piece done by the older students set out for all to see. Magically, as the 6 and 7 year olds spontaneously linked their HaTikvah learning to the art created by the older students, they burst into song. You guessed it…HaTikvah!
Let me know (lbellet@ohds.org) anytime you would like help planning your own community art piece.


